In the previous post I’ve explained how a Control Table should be setup up to handle necessary sources and processing behavior. In this post I’ll explain how to start creating a dynamic pipeline and add customized actions based on the table needs.
When I’m setting up a dynamic pipeline I’m considering what actions should be done with the data tables and I really incorporating the following principles for the development:
– Scalable: even if I start with adding 10-15 tables, the solution must be ready for higher amount of tables even above a hundred or more.
– Sustainable: The solution should be able to handle all types of tables from the appropriate data source. Here we should create the pipeline to handle specific characteristics of the source, e.g. if the source have one or multiple primary keys in the table, if we should handle some column exclusions, or if there are specific data types that should be converted to Synapse compatible data types.
– Performant: Pipelines should run as fast as possible and the created tables should also be performant to serve the underlying data models or reports. Here we need to find the proper balance which modelling best practices to use and which ones to avoid if they costs too much on one of the other side.
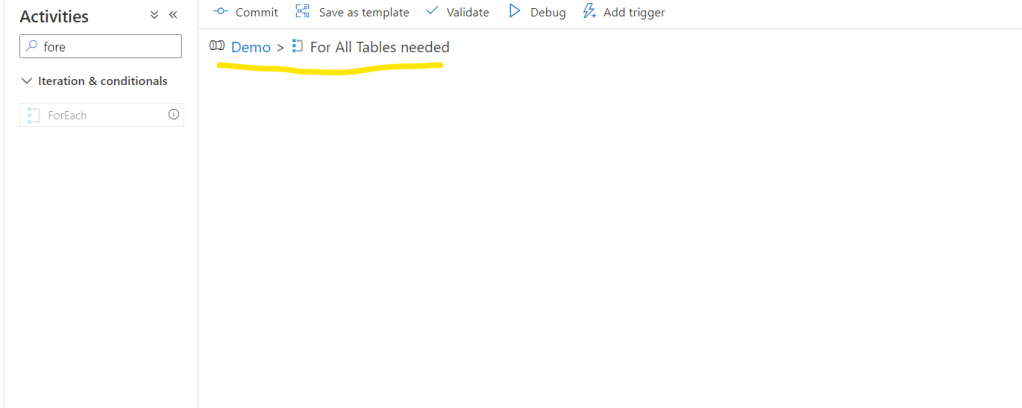
- 1. step: Creating our pipeline
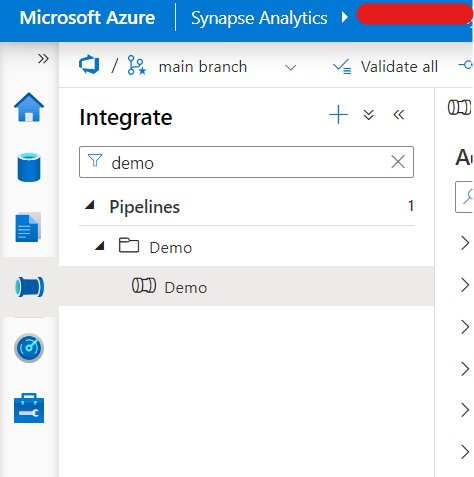
Navigate to the Integrate menu on the left. Create a new pipeline. Let’s call it now Demo. You can commit it and after that it will be visible


- 2. step: Adding Timestamp for the pipeline
I’m usually adding a timestamp to the pipeline. This timestamp will indicate to business when the pipeline was run and what is the latest system data available in the database.
First, let’s create a variable for the pipeline. You can click the Variables tab and add a new. Call it varTimestamp

Secondly, let’s search the Set variable activity in the General group and drag it to the canvas:
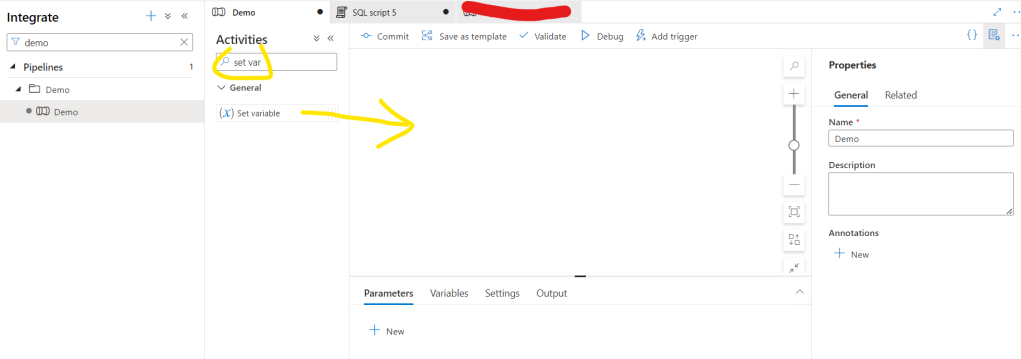
Rename it to Set Timestamp

Go to Settings page and select the above created varTimestamp variable.

Then for the Value click the Add dynamic content:

And in the expression builder type the following code and click OK:
@formatDateTime(utcnow(),’yyyy-MM-dd HH:mm’)

- 3. step: Lookup the list of tables to be ingested.
Now we will use the Control Table we created in the previous chapter to lookup the tables we would ingest. For the that let’s choose the Lookup activity, drag it to the canvas.
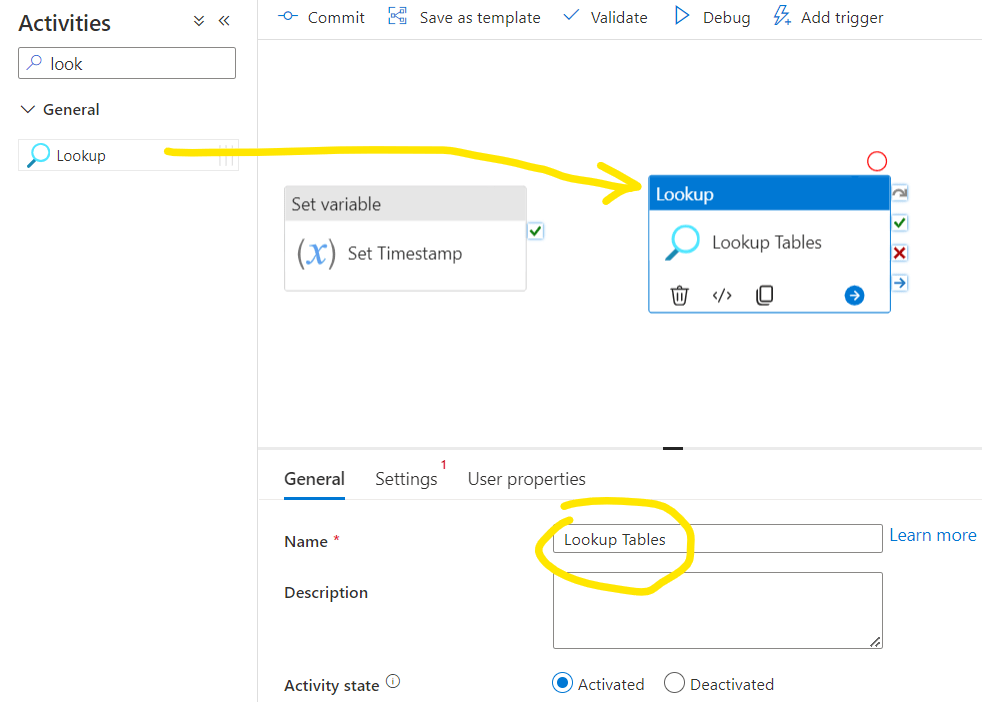
Then we should connect it to the previous step which is the Set variable, at least, if they are dependent on each other. Here I think those are not dependent so we can keep them disconnected.
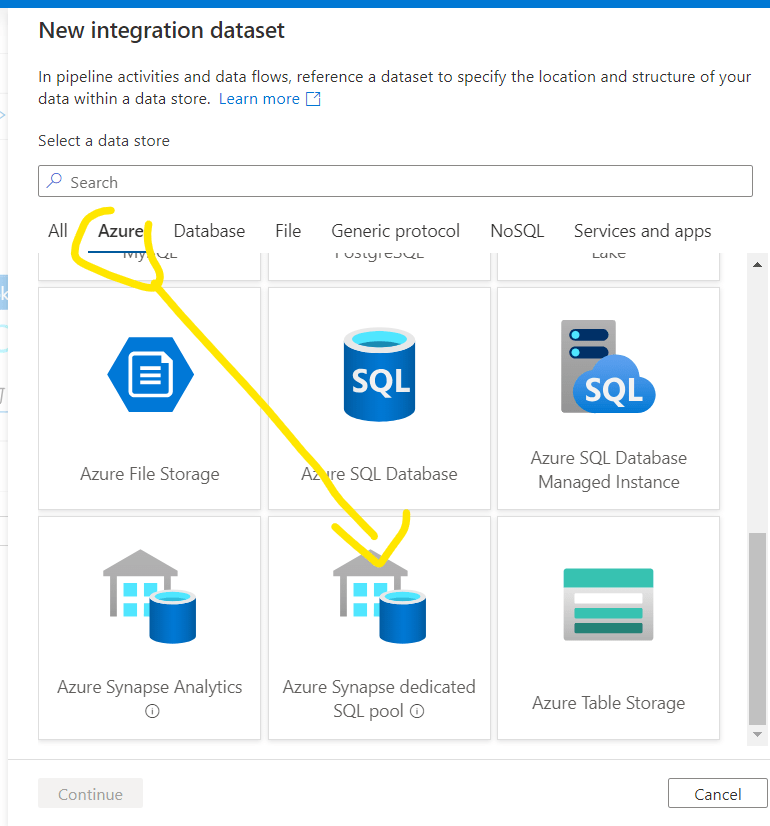
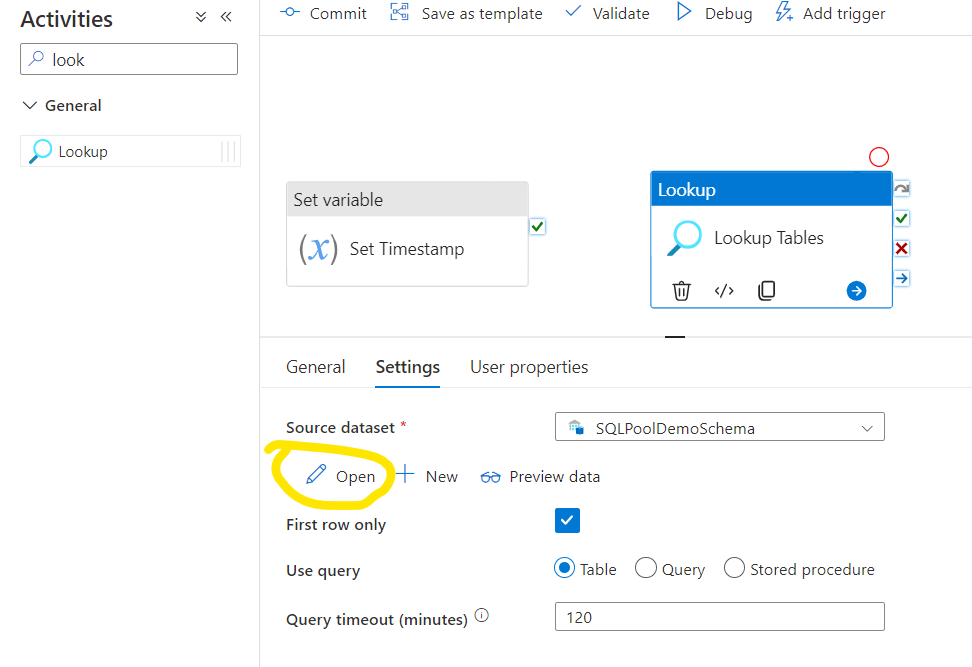
Navigate to the Settings tab of the Lookup object. First we need to select the Source dataset. We can create a new one if we don’t have it yet. We can create a specific dataset that is directly refencing the demo Control Table, or we can specify a dynamic dataset where a parameter can call the necessary table from the specific schema. This way we can use this dataset in other steps of the flow and dynamically change the table names on demand. So now click New:

Choose the appropriate source type, now I’ll use my Dedicated SQL Pool:
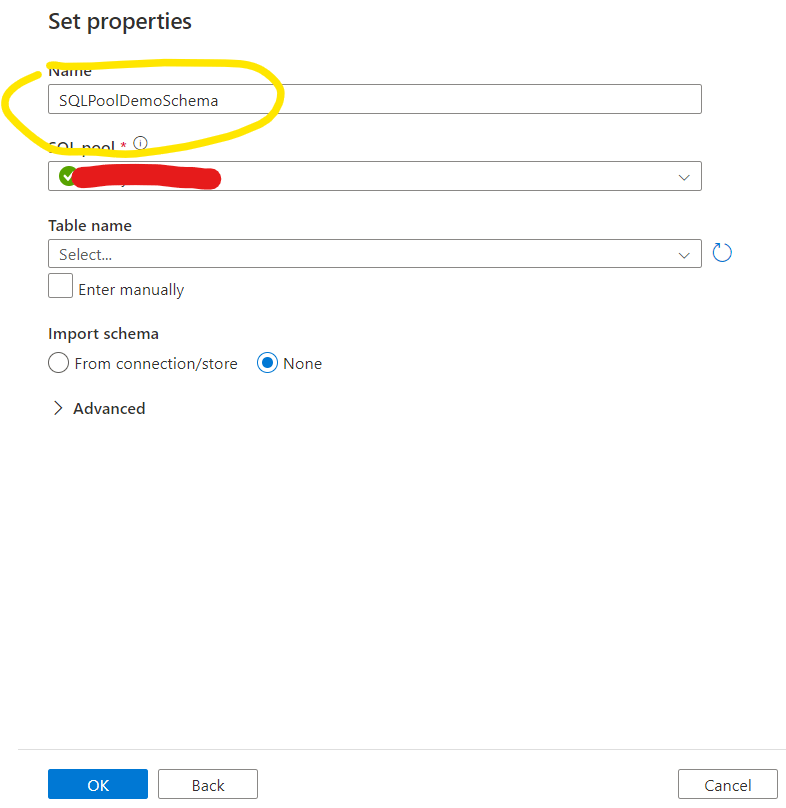
Enter a meaningful Dataset Name, select your dedicated pool and keep the Table Name unselected for now. Click OK.
After that the Dataset will be visible and selected on the Source dataset selection. Now we need to add a parameter that specifies the necessary Table. Let’s open the dataset first:
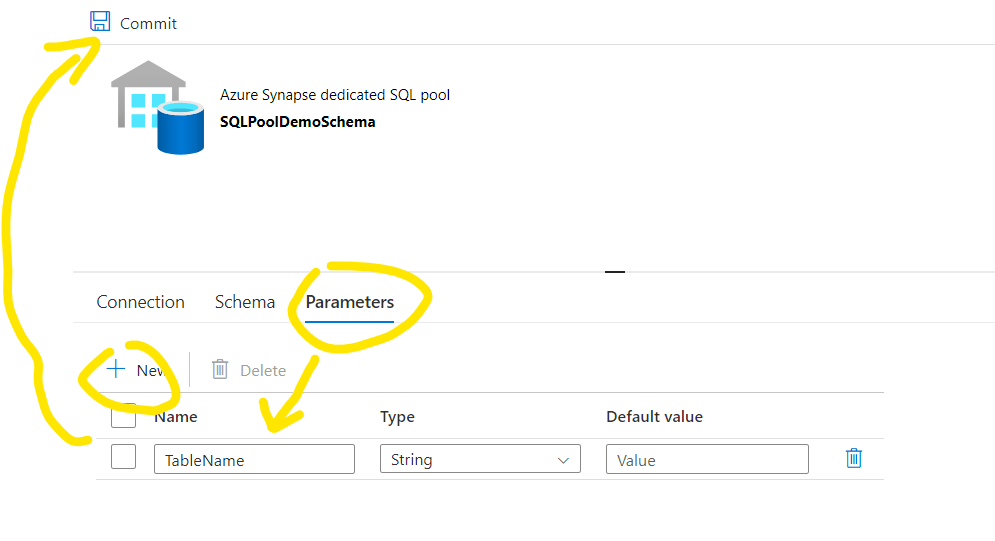
Navigate on Parameters tab, add a new parameter and call it TableName. Set it as a string and keep the default value empty. Click the Commit then and you can close the dataset and navigate back to the pipeline Lookup settings
Now the parameter will be visible and we should set it for this step. Now we want to query the Control Table, so I’m just adding the name of the Control Table there:

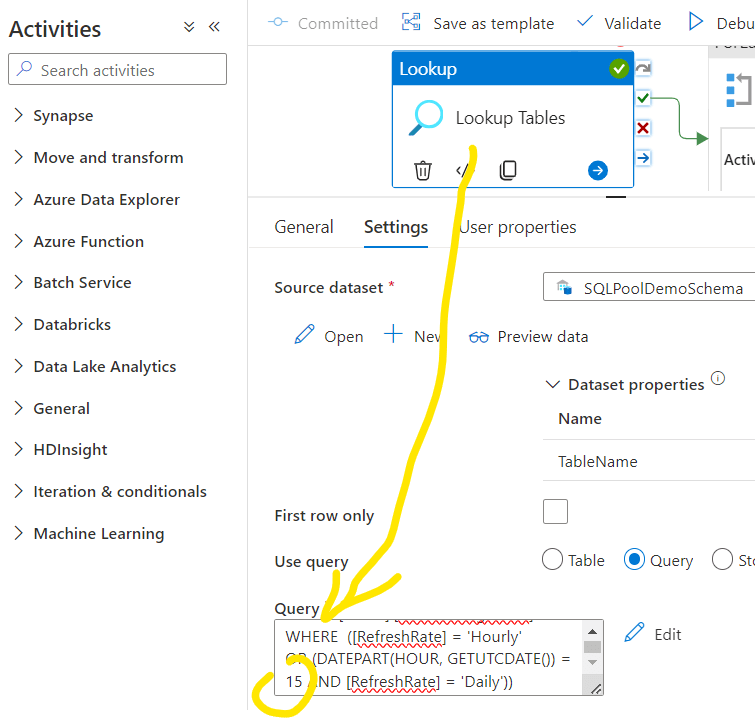
After that let’s switch to Query mode and here we can start customizing the list of tables for the further steps. We will query the Control Table and in this step we can already control if we are going to work with Hourly or Daily refresh rate tables. The following query ensures that the next steps will be applied only for the Hourly tables in each runs and for the daily tables only at the specified time:
SELECT [TableName]
,[SCD2]
,[Type]
FROM [demo].[TablesforIngestion]
WHERE ([RefreshRate] = ‘Hourly’
OR (DATEPART(HOUR, GETUTCDATE()) = 6 AND [RefreshRate] = ‘Daily’))
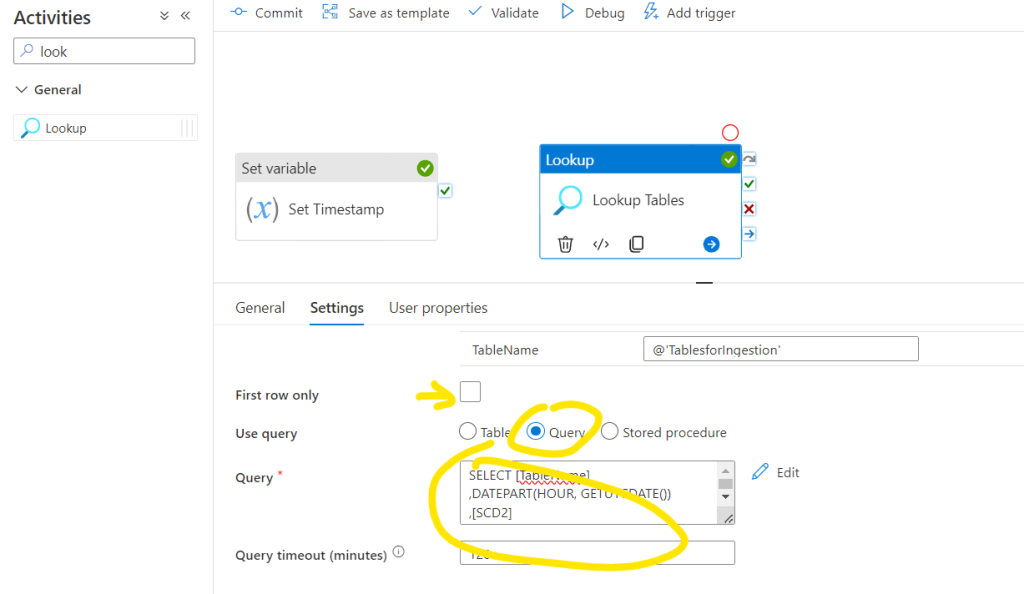
An important step here to uncheck the First row only option. This ensures that later on multiple rows will be called from the Control Table.
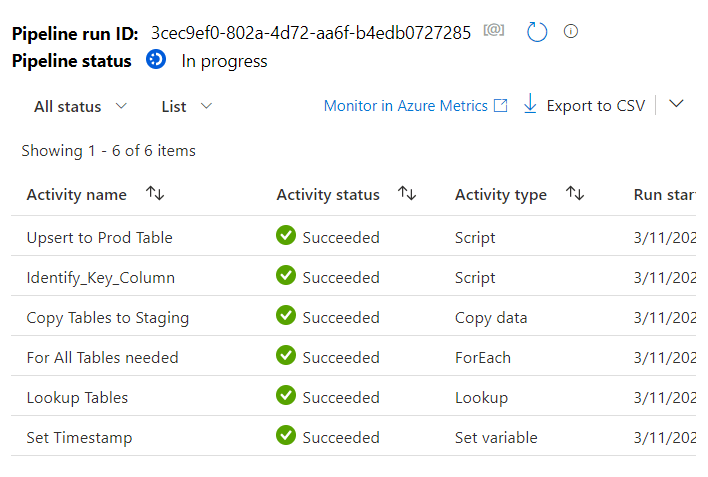
Now it is time to check what we have so far. Let’s Commit the pipeline and run Debug:
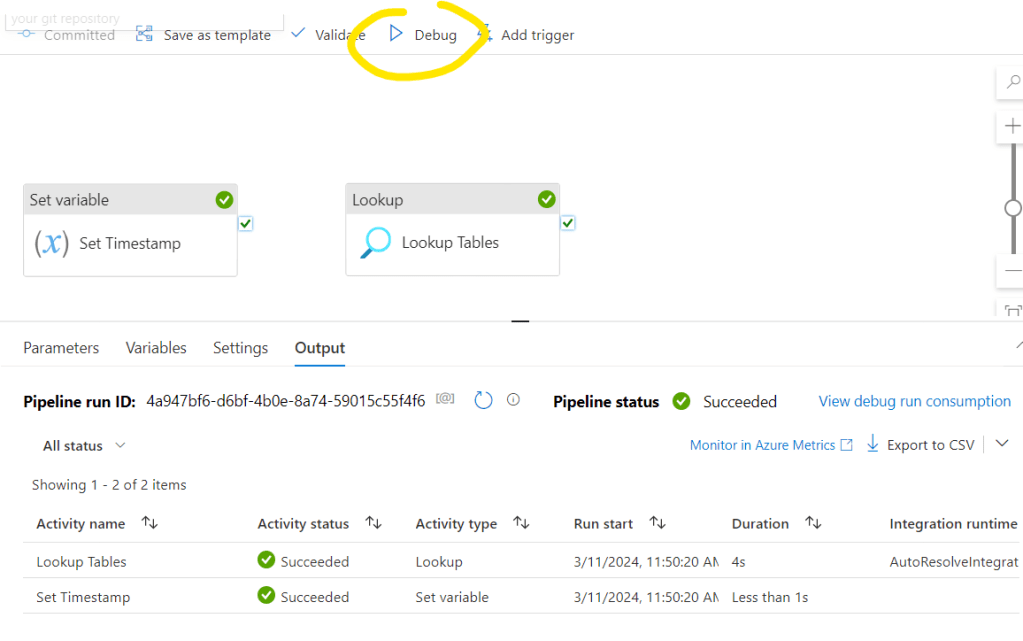
Below you will see if the steps are succeed or failed and you can check their details. Also you can check what are the inputs and outputs for the specific actions. If I select the output of the Lookup Tables object:
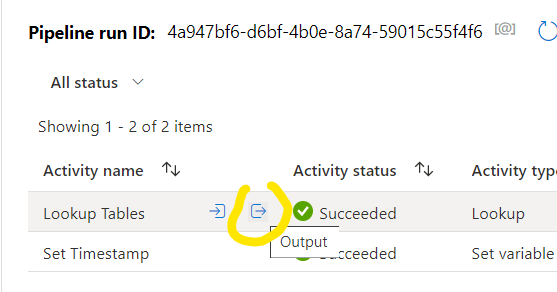
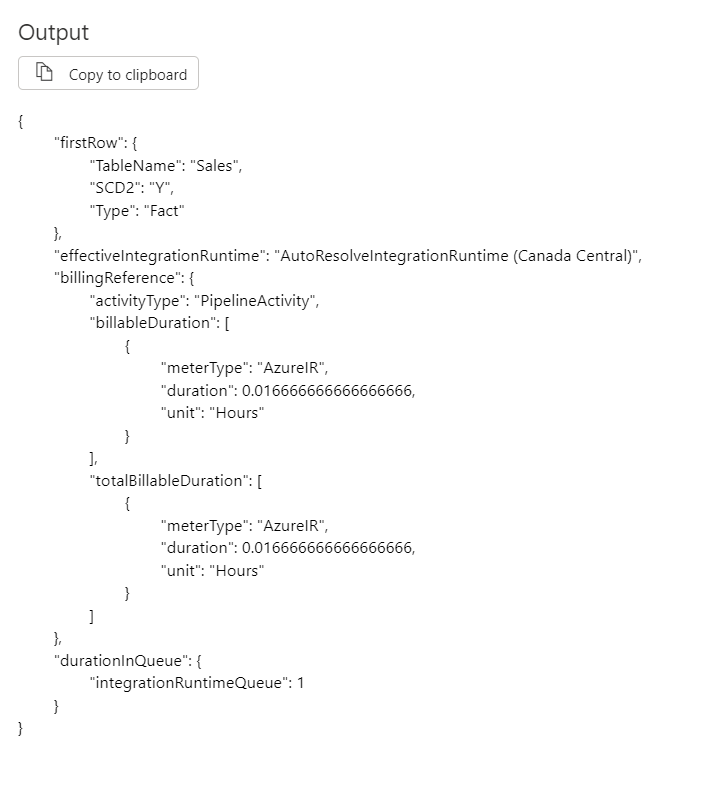
Note that now we received only 1 table to be processed that’s the Sales Table which was set to hourly refreshment. Now let’s see what happens if we run the pipeline when the daily refreshment happens:

Here you can see that all three tables are showing as query results which we will need.
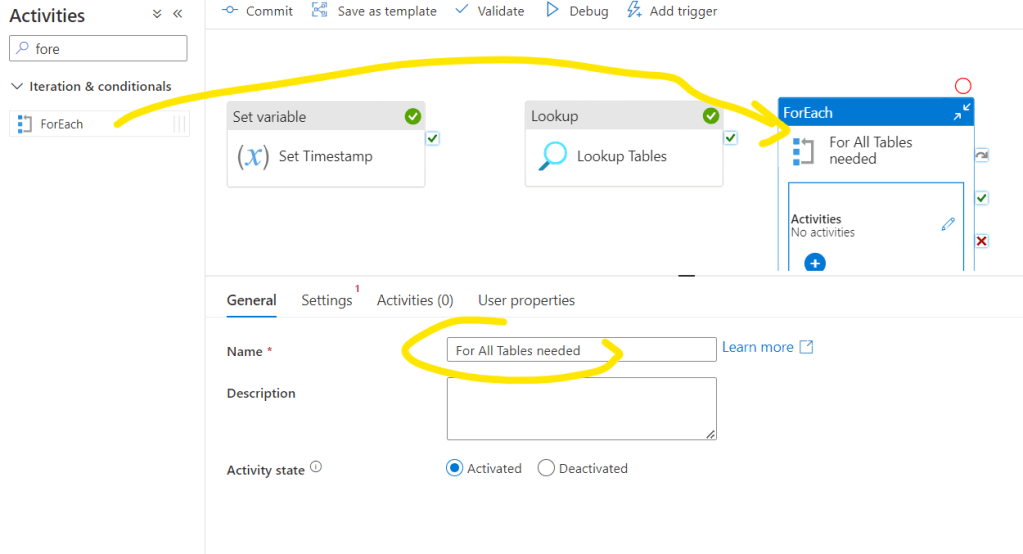
- 4. Step: Setting up the action we would like to process for each tables.
Search the ForEach activity and drag it to the canvas. Give it a name.
Then go to Settings tab. Please note that there is an option called Sequential. If it is checked than the processing will be sequential after each other. This option might be important e.g. if you work with API’s where concurrent call might corrupt each others, etc… Most of the times we should leave it unchecked and it’s behavior will be that all tables will be processed parallelly.

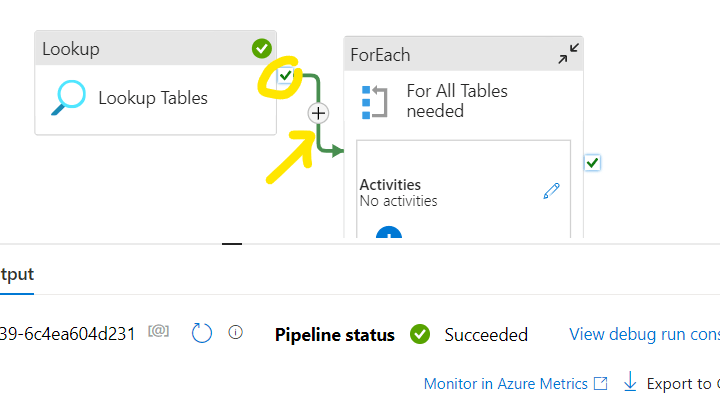
Now we should set that the ForEach loop will process the tables which we queried in the previous step. For that first we need to setup a connection between the Lookup Tables object and the ForEach loop. ForEach loop can start only if the Lookup Tables object is succeed. For that click and hold on the Green check icon on the right side o the Lookup Tables object and pull it into the ForEach object:
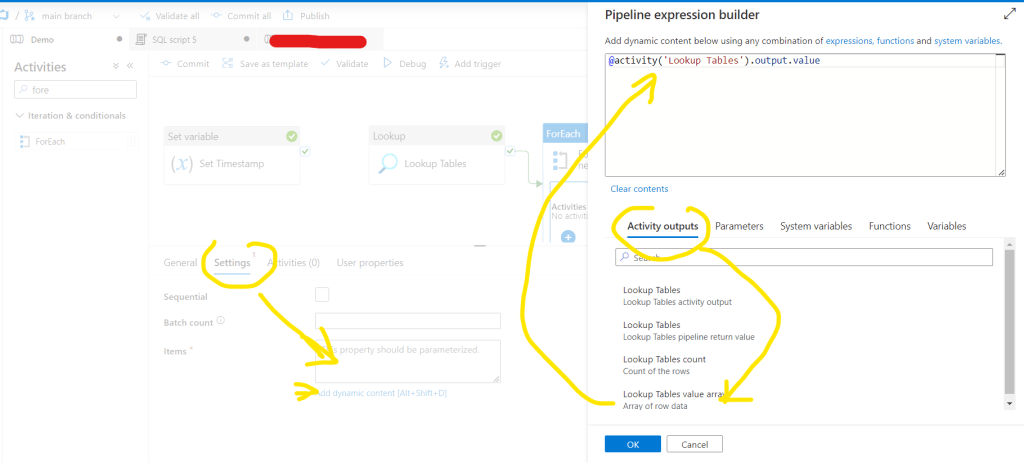
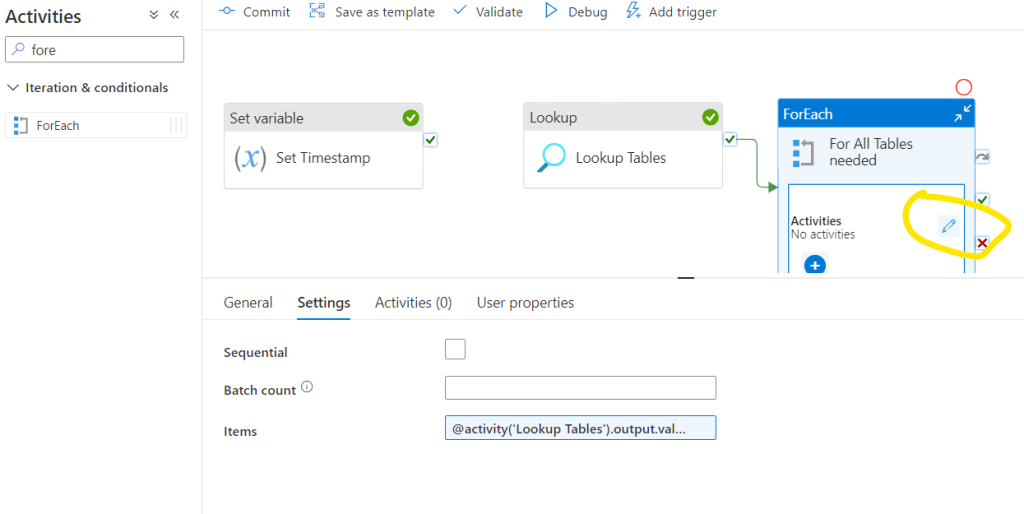
Now go back to the FoEach object Settings tab and click the Items in Add dynamic content mode. There in the Activity outputs select the Lookup Tables output value. Then click OK:
With this we will loop all tables and we can start to setup what actions we would like to do with the tables. Click the Edit button within the ForEach loop:
Please note that we are now in a nested part of the entire pipeline:
Let’s do a Copy activity:
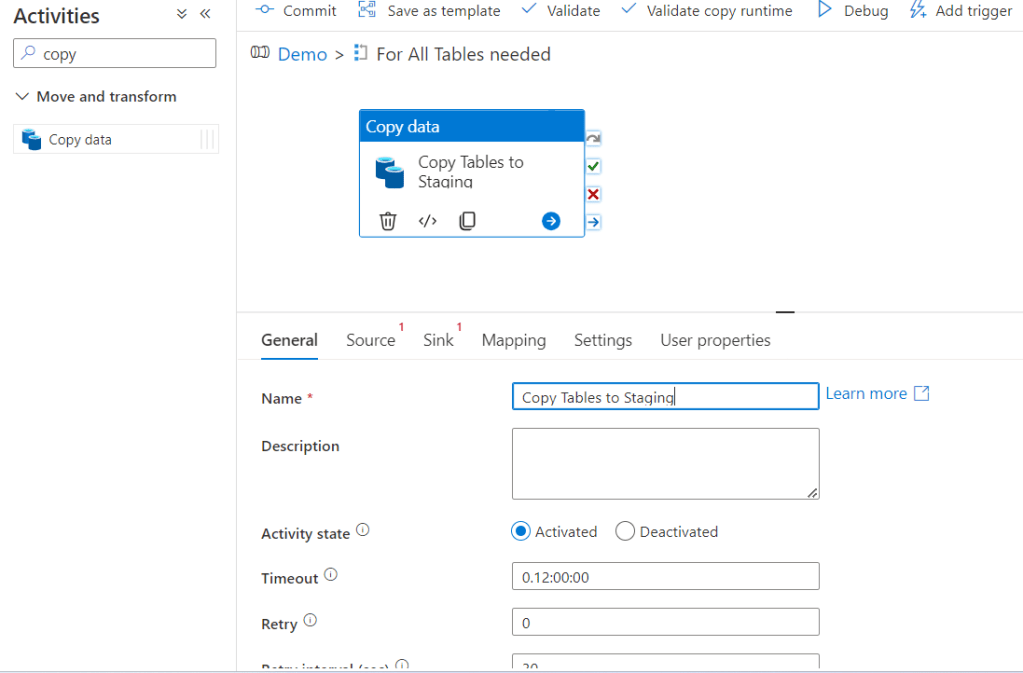
First setup the Source. Let’s create New – now I’ll open the file from datalake:
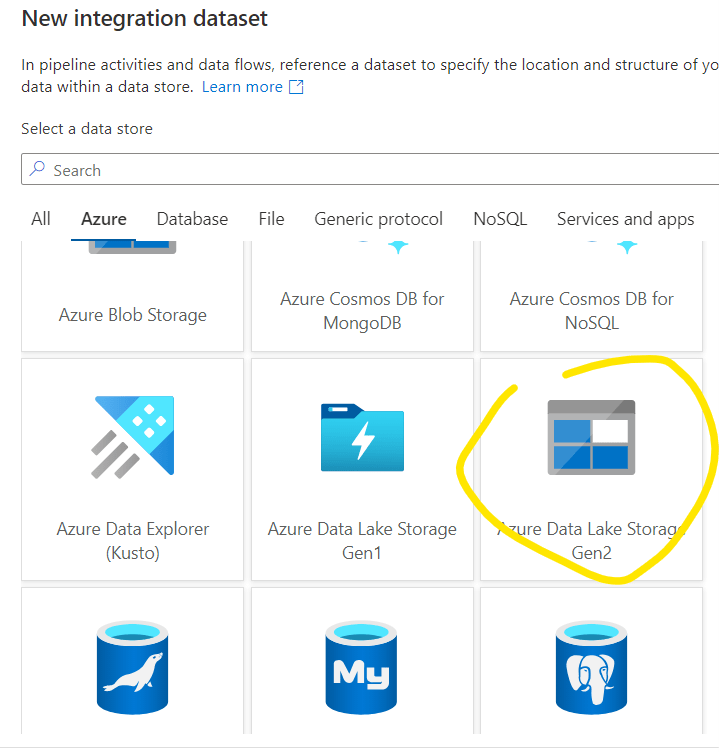
Continue:

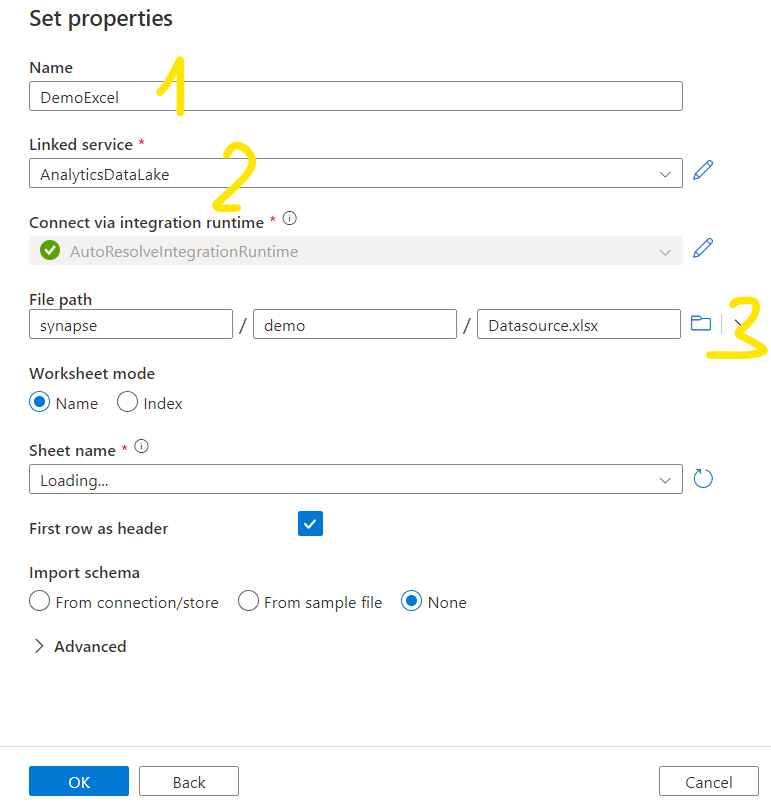
Give a Name to the source and select the proper linked service. Search the file in the data lake. Keep the Sheet Name empty for now. The import schema is None. Click OK.
It will now show up in the pipeline. Select Open:
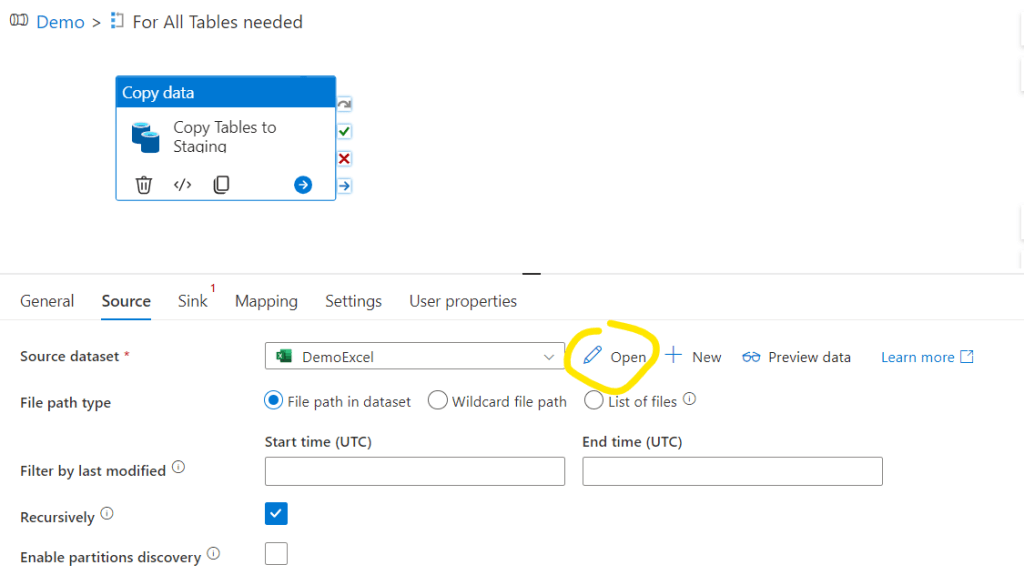
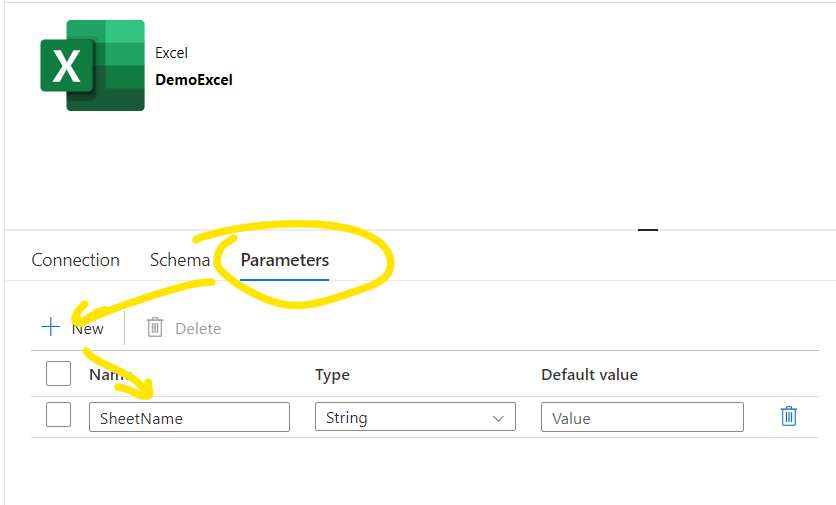
Go to Parameters and create a parameter called SheetName. With that we will tell the pipeline which sheet it should work with. This will be equivalent to the TableName we queried in the previous steps.
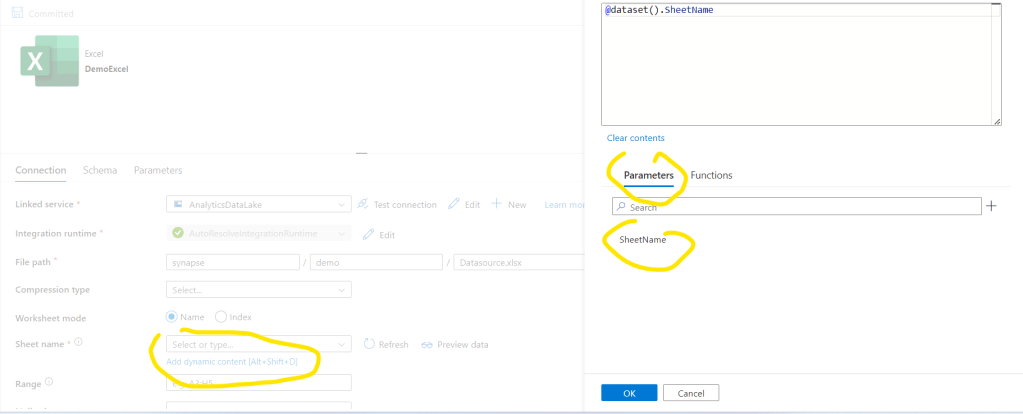
Go back to the Connection tab and we should set that the sheet name should be selected based on this parameter. Then click OK and click Commit:
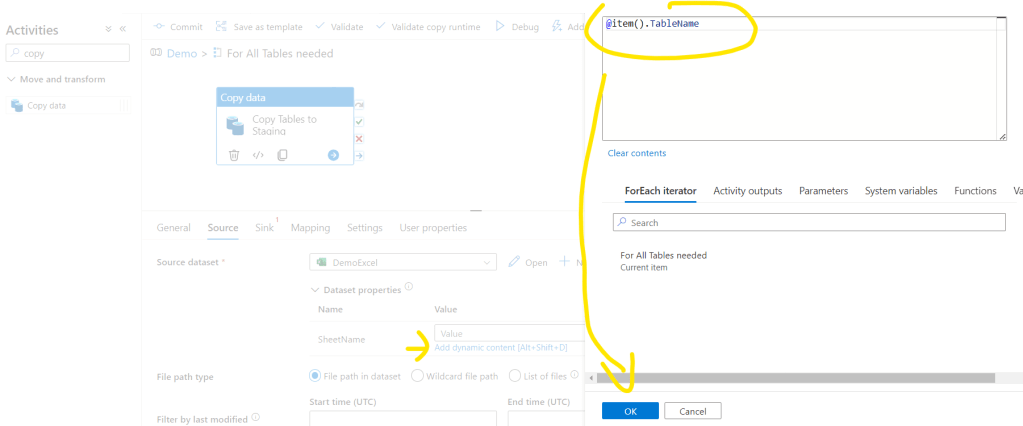
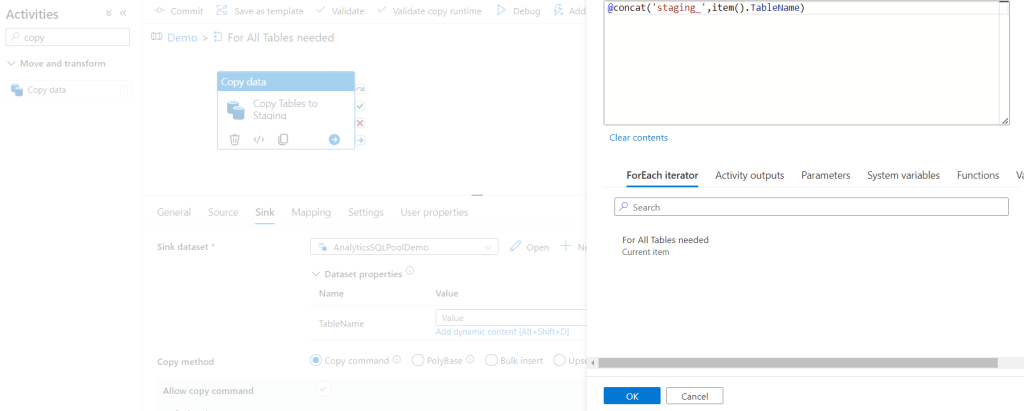
Close the Excel dataset. Back to the Source tab of the Copy activity now we will see the SheetName parameter and we should assign the proper value for it. Click on the Add dynamic content and here we can reference the current Table Name with the item().TableName command. Click ok:
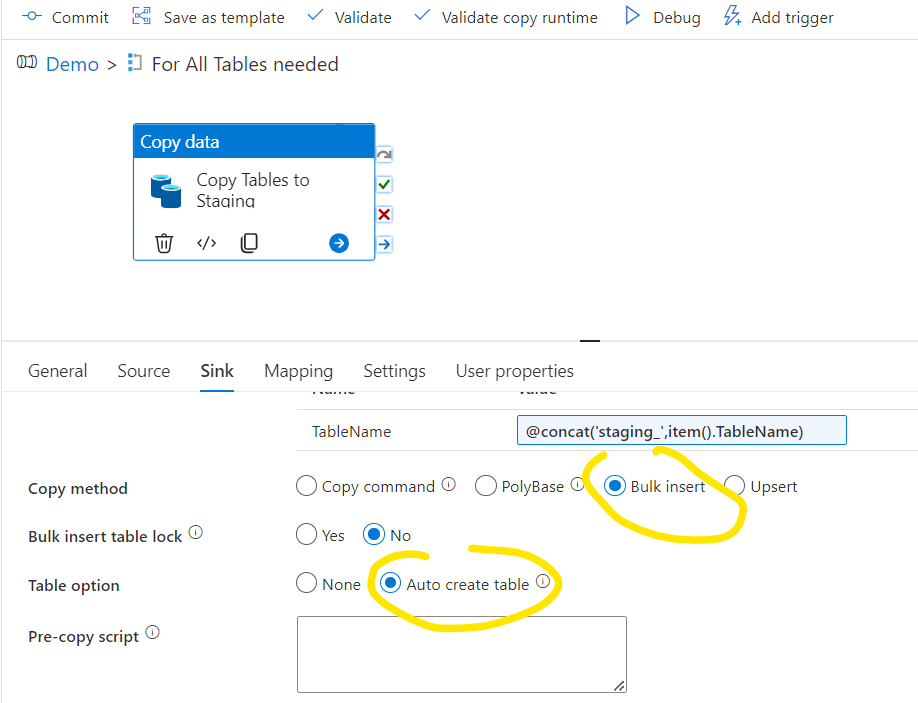
We are ok now with the Source settings. Let’s move to the Sink tab. Here first we should select the Sink dataset. As we already created it as a dynamic dataset in the previous step we should just select the Demo dataset. Then click the Add dynamic content to the TableName. First we will create a staging table so for that we will ad a staging prefix and the TableName – in production environment it worth having a separated staging schema, but for the demo purposes we will use the same demo schema only with a staging prefix. Then click OK:
For Last step here I’m selecting the Bulk insert method and the Auto create table for now:
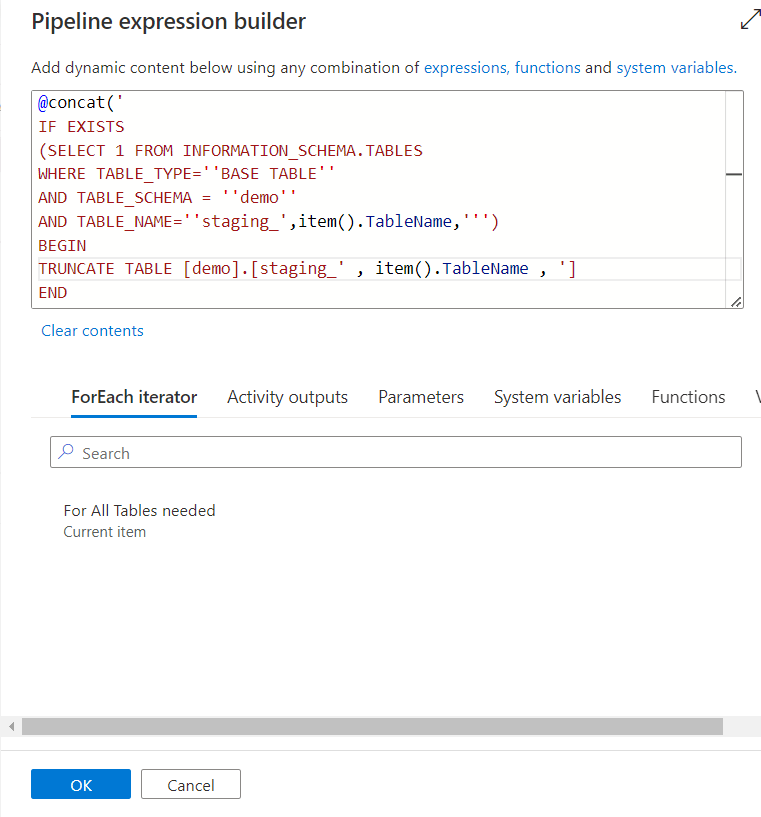
An important step here to add a Pre-copy script that is truncating the staging table, otherwise the copy command will multiplicate records in the staging table. Click the Add dynamic content on the Pre-copy script and add:
@concat(‘
IF EXISTS
(SELECT 1 FROM INFORMATION_SCHEMA.TABLES
WHERE TABLE_TYPE=”BASE TABLE”
AND TABLE_SCHEMA = ”demo”
AND TABLE_NAME=”staging_’,item().TableName,”’)
BEGIN
TRUNCATE TABLE [demo].[staging_’ , item().TableName , ‘]
END
‘)
Let’s commit the pipeline changes and try Debug:
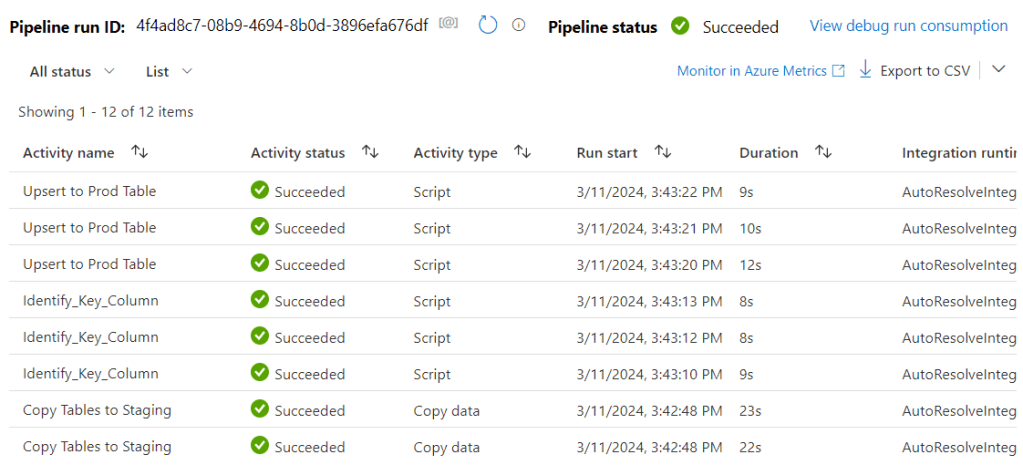
Note that there are three Copy activities run, so the pipeline was processing all 3 tables we wanted:
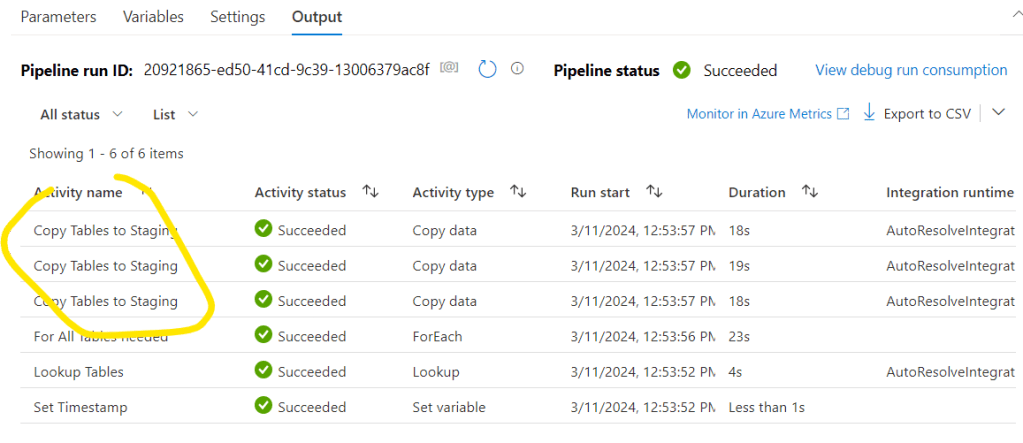
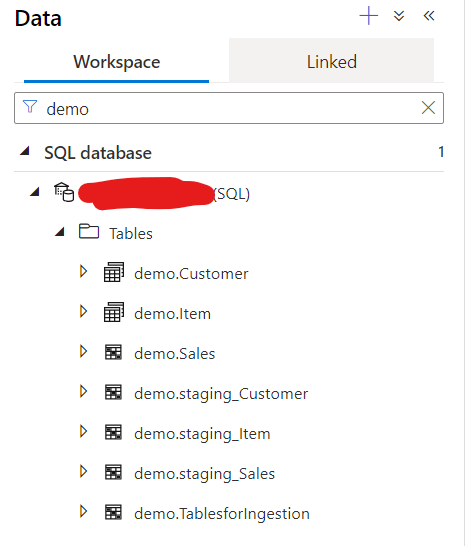
Also when I refresh the Database Tables, I can see the 3 new tables there:

- 5. Step: Create prod tables with proper distribution and indexing methods.
Let’s go back to the ForEach loop where the Copy activity was set up. Now we will search the key columns first. Key columns will be needed for Hash distribution setup which is the appropriate distribution for Fact tables. There are many different ways to identify the keys for the table. For SQL server we can run a query against INFORMATION_SCHEMA_COLUMNS, in Salesforce it is pretty static to use ‘Id’ column, or we can specify the key column(s) in the Control Table as well. For this Demo we will refine the name of the first column in the excel sheets as I’ve set the first columns as the PK’s there.
For that the first task is to refine that column name. As in the previous step we have already copied the data to staging tables, here we can query the staging table and identify the first column name of them. Let’s add a Script activity. Name it properly and don’t forget to connect it to the succeed Copy activity.
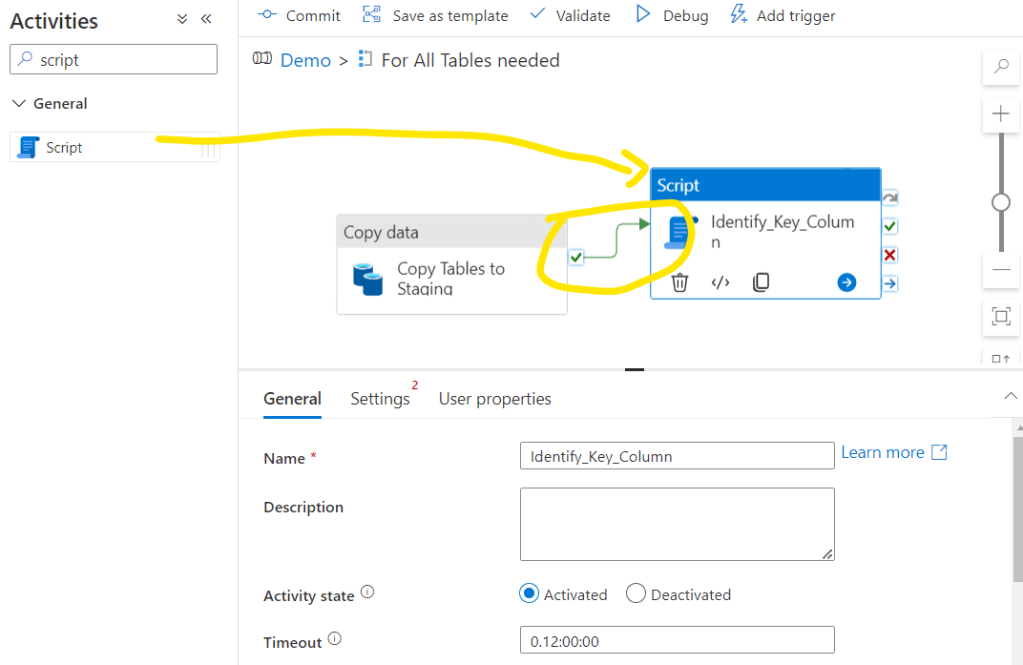
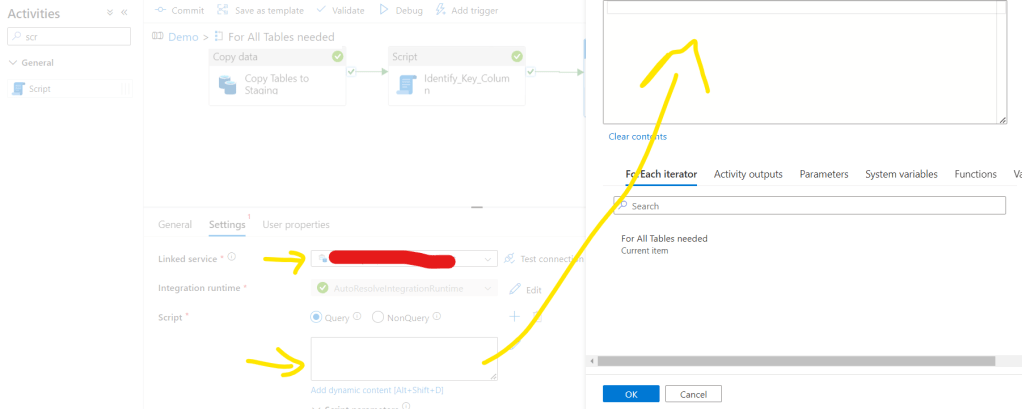
Then go to Settings tab and select the Dedicated SQL Pool as Linked service and click Add dynamic content on Script:

Now let’s check how to create the script that should be dynamically changing for each tables we have. The basic script would look like this e.g. for the first, Customer table:
SELECT COLUMN_NAME FROM INFORMATION_SCHEMA.COLUMNS
WHERE TABLE_SCHEMA = ‘demo’
AND TABLE_NAME = ‘staging_Customer’
AND ORDINAL_POSITION = 1
The part of the TABLE_NAME should be parametrized for the pipeline. We can setup a query with parameter with a concat function and referencing the current item of the ForEach loop. So in the expression builder of the Script the above SQL query will look like this first:
@concat(‘
then the SQL script
‘)

Note that the code looks bad, as we use some ‘ characters in the SQL query that breaks the code. For them we should add an escape character, that is for the single quote is another single quote. So wherever there is a single quote in the SQL script, add another like this:
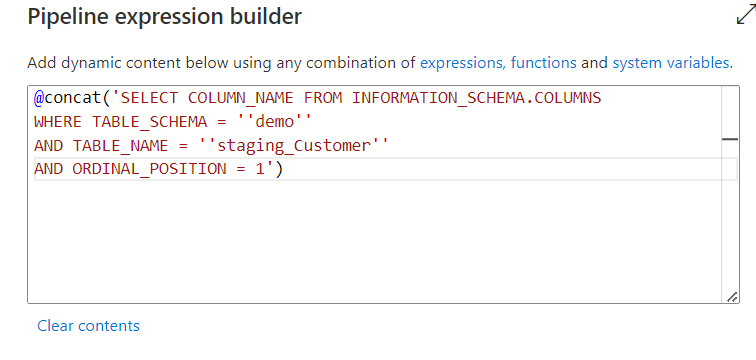
now the code looks good. But we need to make the TableName part dynamic. So the “staging_” will be common, but the Customer will be Item and Sales for the other tables. We should therefore delete the hardcoded table name and break the concat with single quotes and commas and replacing the “Customer” we will add the dynamic TableName we are running the ForEach loop for.
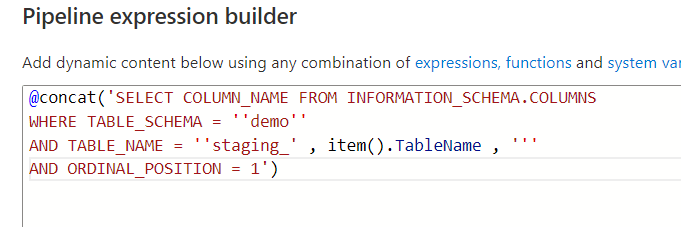
So the final code:
@concat(‘SELECT COLUMN_NAME FROM NFORMATION_SCHEMA.COLUMNS WHERE TABLE_SCHEMA = ”demo” AND TABLE_NAME = ”staging_’ , item().TableName , ”’ AND ORDINAL_POSITION = 1′)
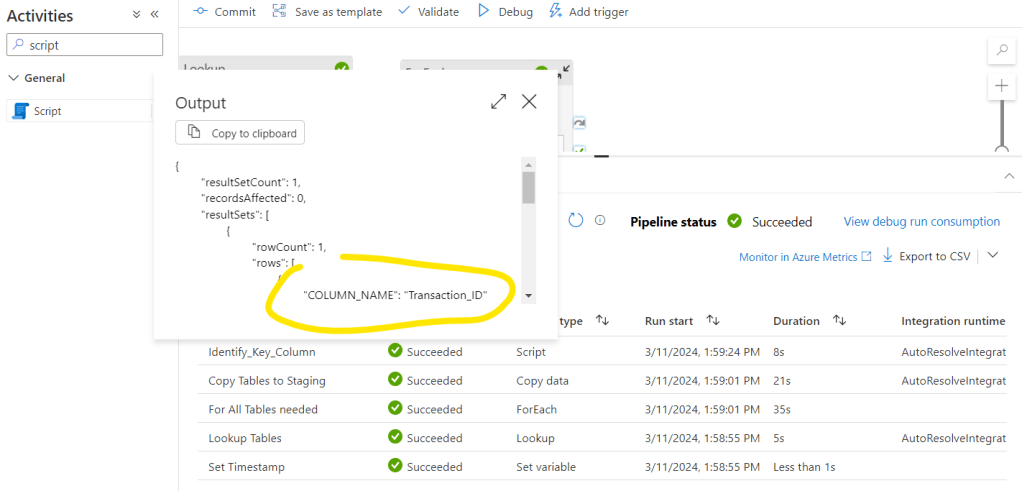
Then click ok. Let’s debug the flow and see what results we receive. Click again on the Outpot button next to the new Identify_Key_Column activity and see the JSON schema with the COLUMN_NAME. This is the object we will need to call in the next activity:
And here comes the steps when we push the data from staging to prod by creating the prod table with the proper distribution and indexing:
Let’s create another Script after the Identify_Key_Column one, call it Upsert to Prod Table.
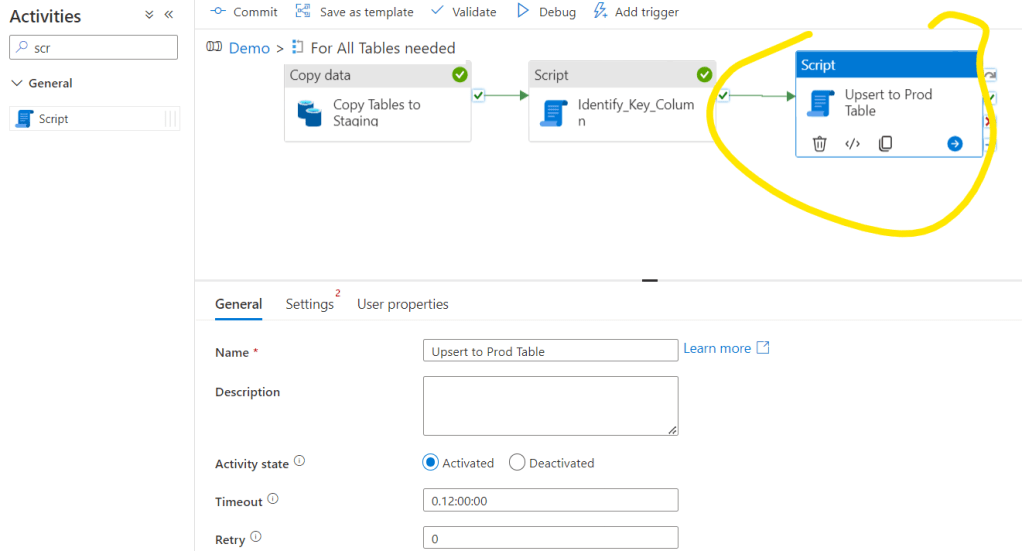
Let’s go to Settings, add the Linked Service and start to generate the necessary code:
For now we will do the following actions in this step: we will check if the table already exists. If not, then we will create a new table with the proper settings, if yes, we will upsert the table with the proper key column. First we need to check if the table exists already. we can do that with the following code:
@concat(‘
IF EXISTS
(SELECT 1 FROM INFORMATION_SCHEMA.TABLES
WHERE TABLE_TYPE=”BASE TABLE”
AND TABLE_SCHEMA = ”demo”
AND TABLE_NAME=”’,item().TableName,”’)
BEGIN
activity if exists
END
ELSE
BEGIN
activity if doesnt exist
END
‘)
Not that we have the placeholders for the activities either the table exists or not.
If the table doesn’t exist yet, we should create it. We can do that with the following code:
CREATE TABLE [demo].[‘ , item().TableName , ‘]
WITH
(
DISTRIBUTION = HASH([Key])
,HEAP
)
AS
SELECT * FROM [demo].[staging_’ , item().TableName , ‘]
The table names are already parametrized here, but we also need to make the key column dynamic. Calling the result of the Identify_Key_Column activity will look like this:
activity(‘Identify_Key_Column’).output.ResultSets[0].rows[0].COLUMN_NAME
Here we will have an issue if we move forward with this setting. Unfortunately when we copy from Excel, Synapse cannot identify the column types properly and all of our columns will be nvarchar(max) columns. We can definitely have better results from a maintstream database/application like SQL Server or CRM system identifying the proper data types but not for Excel. And nvarchar(max) is a data type that is not supported with HASH distribution so for this reason for the Demo I’ll move forward with a ROUND_ROBIN distribution
By default I’m using Hash Distribution for Fact tables, Replicate for Dim tables and Round_Robin for staging tables. For indexing I usually use HEAP that’s the best option for smaller tables, but above 60M records, CLUSTERED_COLUMSTORE index is recommended – considering that there is no nvarchar(max) type of field in the table. So to choose between the distribution methods wether this is a Fact or a Dim Table we can use the following code snippet – where [Key] should be replaced by the above activity output:
, if(equals(item().Type, ‘Fact’),’HASH([Key])’,’REPLICATE’) ,
The full code part for creating the new table with the proper distribution and indexing is the following:
CREATE TABLE [demo].[‘ , item().TableName , ‘]
WITH
(
DISTRIBUTION = ‘ , if(equals(item().Type, ‘Fact’) , concat(‘HASH([‘ , activity(‘Identify_Key_Column’).output.ResultSets[0].rows[0].COLUMN_NAME , ‘])’) ,’REPLICATE’) ,
‘,HEAP
)
AS
SELECT * FROM [demo].[staging_’ , item().TableName , ‘]
If the table already exists we should upsert the table that we can do several different ways. No we will use the following. This script will
DELETE FROM [demo].[‘ , item().TableName , ‘] WHERE [Key] IN (SELECT [Key] FROM [demo].[staging_’ , item().TableName , ‘])
INSERT INTO [demo].[‘ , item().TableName , ‘] SELECT * FROM [demo].[staging_’ , item().TableName , ‘]
Here the [Key] fields also should be parametrized so it will look like:
DELETE FROM [demo].[‘ , item().TableName , ‘] WHERE [‘ , activity(‘Identify_Key_Column’).output.ResultSets[0].rows[0].COLUMN_NAME , ‘] IN (SELECT [‘ , activity(‘Identify_Key_Column’).output.ResultSets[0].rows[0].COLUMN_NAME , ‘] FROM [demo].[staging_’ , item().TableName , ‘])
INSERT INTO [demo].[‘ , item().TableName , ‘] SELECT * FROM [demo].[staging_’ , item().TableName , ‘]
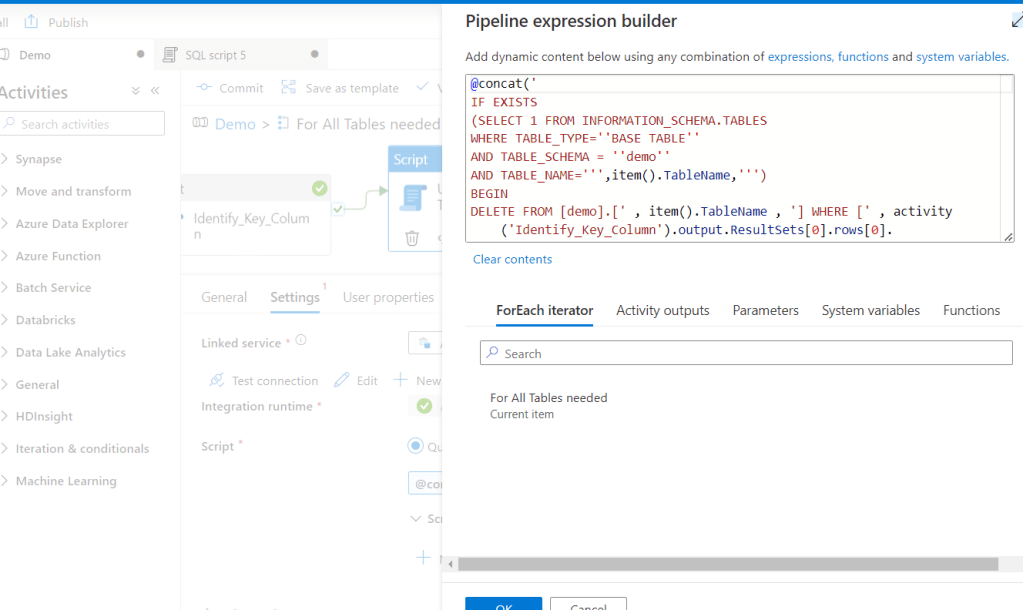
So the full code for the Upsert to Prod Table will be the following:
@concat(‘
IF EXISTS
(SELECT 1 FROM INFORMATION_SCHEMA.TABLES
WHERE TABLE_TYPE=”BASE TABLE”
AND TABLE_SCHEMA = ”demo”
AND TABLE_NAME=”’,item().TableName,”’)
BEGIN
DELETE FROM [demo].[‘ , item().TableName , ‘] WHERE [‘ , activity(‘Identify_Key_Column’).output.ResultSets[0].rows[0].COLUMN_NAME , ‘] IN (SELECT [‘ , activity(‘Identify_Key_Column’).output.ResultSets[0].rows[0].COLUMN_NAME , ‘] FROM [demo].[staging_’ , item().TableName , ‘])
INSERT INTO [demo].[‘ , item().TableName , ‘] SELECT * FROM [demo].[staging_’ , item().TableName , ‘]
END
ELSE
BEGIN
CREATE TABLE [demo].[‘ , item().TableName , ‘]
WITH
(
DISTRIBUTION = ‘ , if(equals(item().Type, ‘Fact’) , ‘ROUND_ROBIN’ ,’REPLICATE’) ,
‘,HEAP
)
AS
SELECT * FROM [demo].[staging_’ , item().TableName , ‘]
END
‘)
Again I emphasize that in the above final code I use ROUND_ROBIN for simplicity, but I use Hash for fact table otherwise. Click OK, Commit the Pipeline and run a debug:
Let’s check the Tables in the DB view as well:
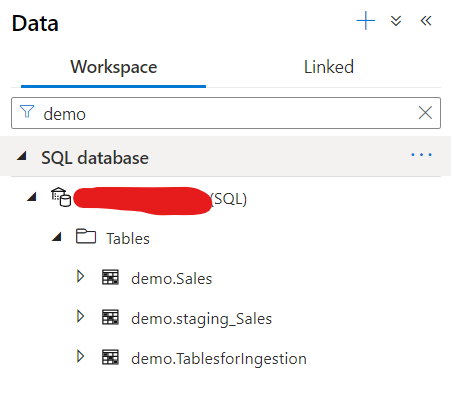
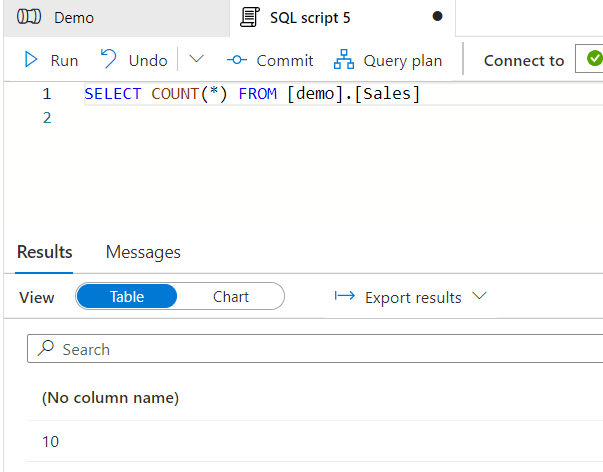
I see now I have both staging and prod table, now take a look how the prod table looks like:
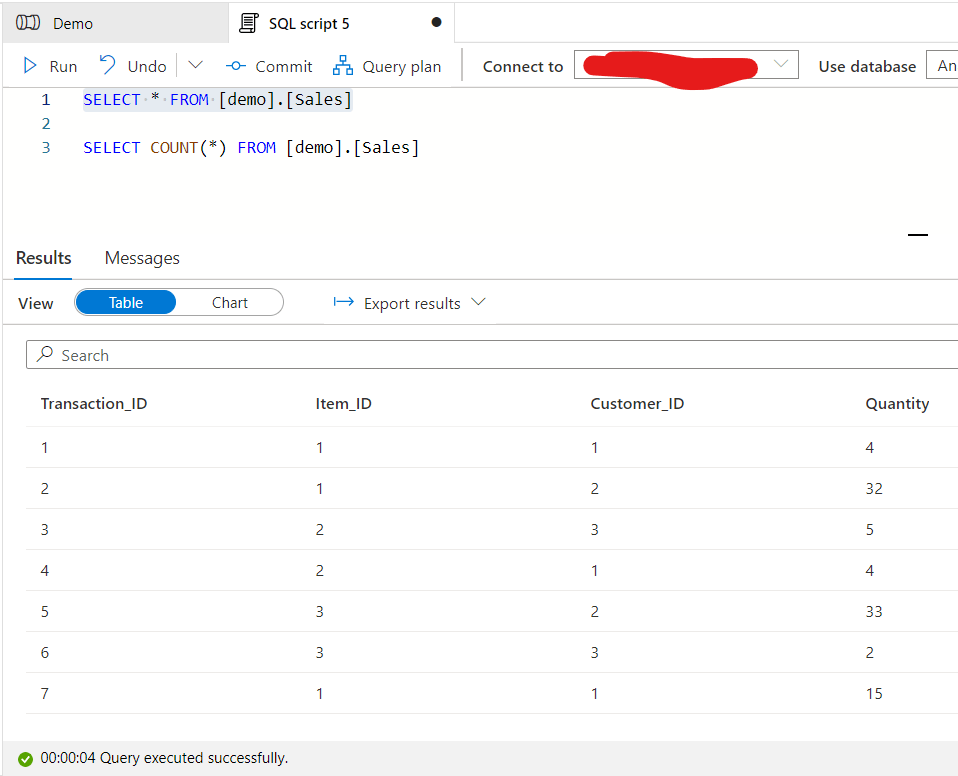
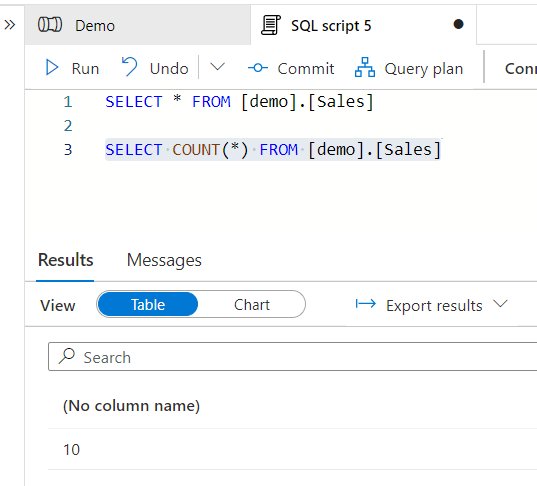
Pretty much what is expected. Now let’s add the other two tables as new and see what is happening with the existing table. Run Debug again after making sure that the Lookup Tables object is set to the hour of now to include the Daily refresh tables as well.
The result:
And if we look at the fact table which is now upserted:
Looks perfect.
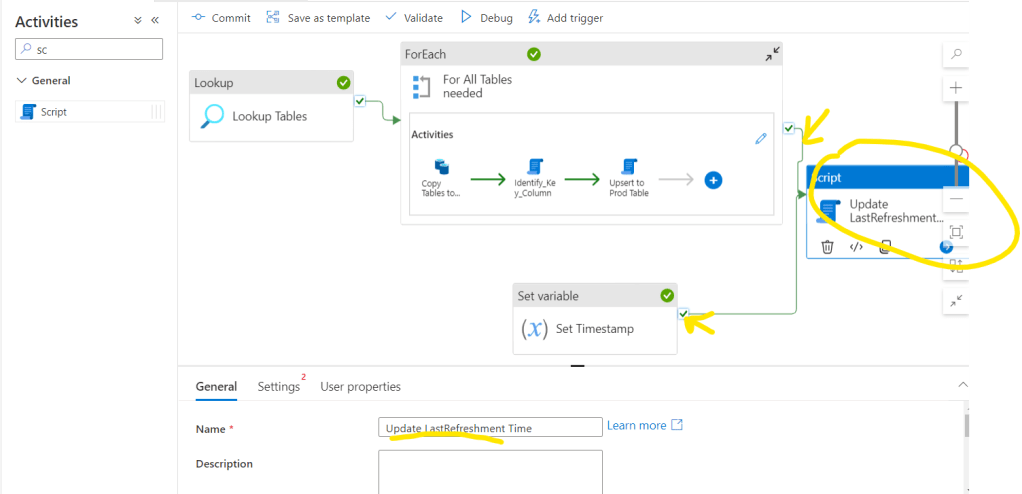
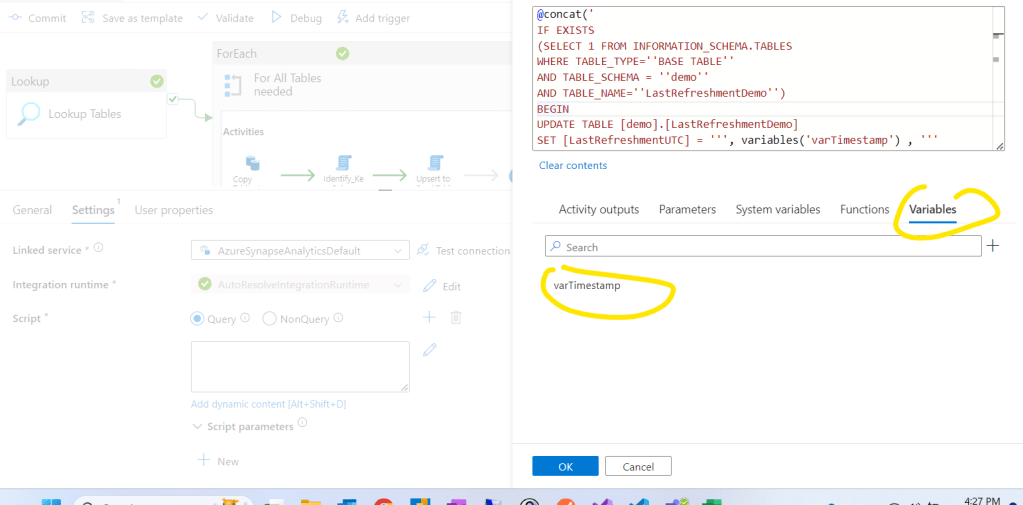
- 6. Step: Updating the lastrefreshment table
At the end of the pipelines I usually add an update script to the LastRefreshment time we set up in the first step. For this go back to the main screen of the pipeline – outside of the nested ForEach – and add a Script activity. Connect it both for the ForEach object and the Set Timestamp object.
And add the following code to the script section using the variable we set with the first step:
@concat(‘
IF EXISTS
(SELECT 1 FROM INFORMATION_SCHEMA.TABLES
WHERE TABLE_TYPE=”BASE TABLE”
AND TABLE_SCHEMA = ”demo”
AND TABLE_NAME=”LastRefreshmentDemo”)
BEGIN
UPDATE [demo].[LastRefreshmentDemo]
SET [LastRefreshmentUTC] = ”’, variables(‘varTimestamp’) , ”’
END
ELSE
BEGIN
CREATE TABLE [demo].[LastRefreshmentDemo]
WITH
(
DISTRIBUTION = ROUND_ROBIN
,HEAP
)
AS
SELECT ”’ , variables(‘varTimestamp’) , ”’ as ”LastRefreshmentUTC”
END
‘)
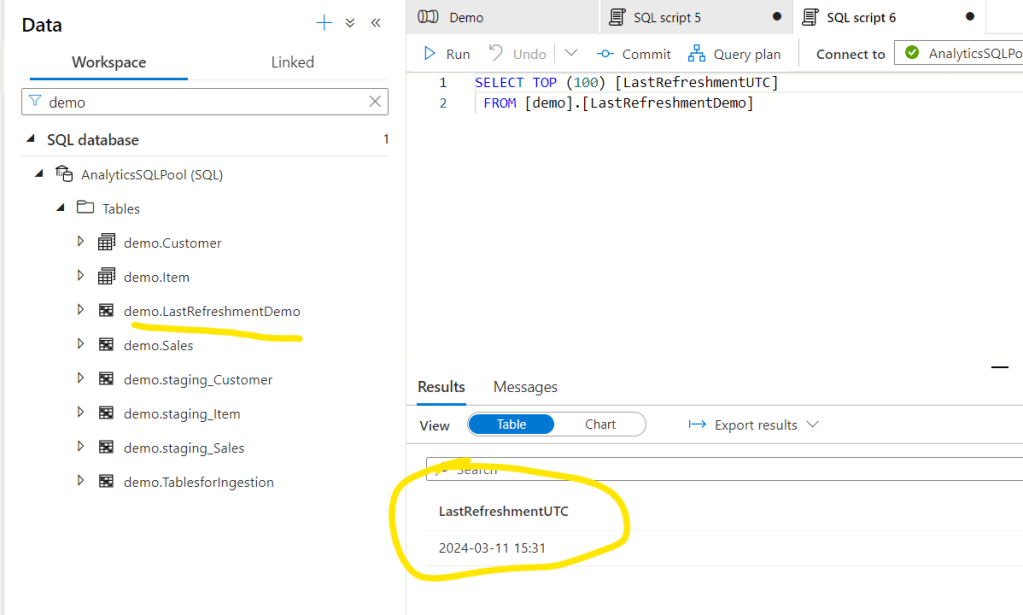
Now we can see the LastRefreshmentDemo table and we can reference it in reports or data solutions.
And that’s it for now. We set up a basic dynamic pipeline with the help of our Control Table. This pipeline is definitely a basic one and moving forward a lot of other functionalities can be built in like:
- Historization methods like SCD2
- Dynamic schema change tracking and adjustment
- Incremental data refresh and handling hard deletes
- Updating Statistics
- etc.
More to come in next articles 🙂 Thanks for reading.


Leave a comment